
十二、Vuex
Vuex 是什么?
Vuex 是一个专为 Vue.js 应用程序开发的状态管理模式。它采用集中式存储管理应用的所有组件的状态,并以相应的规则保证状态以一种可预测的方式发生变化。
什么是“状态管理模式”?
让我们从一个简单的 Vue 计数应用开始:
new Vue({
  // state
  data () {
    return {
      count: 0
    }
  },
  // view
  template: `
    <div>{{ count }}</div>
  `,
  // actions
  methods: {
    increment () {
      this.count++
    }
  }
})
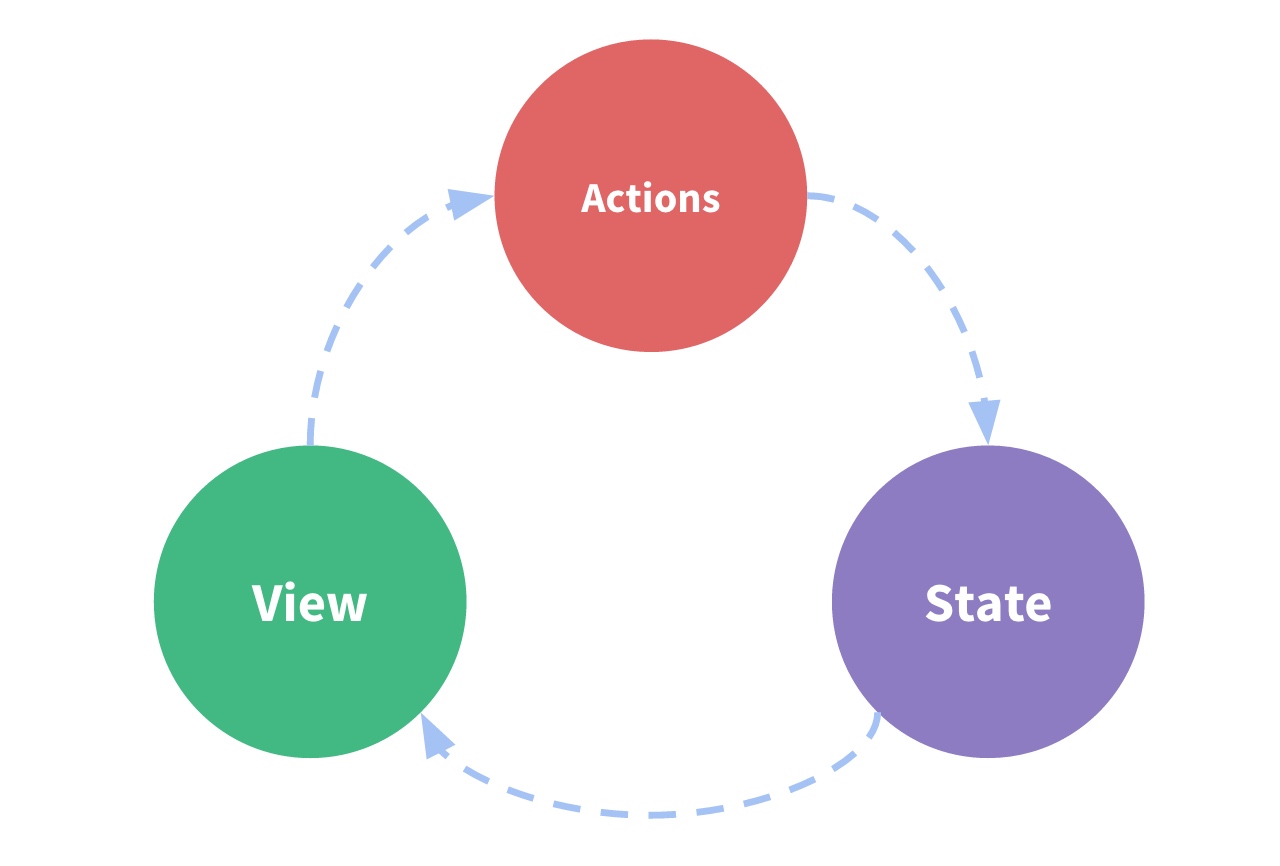
这个状态自管理应用包含以下几个部分:
- state,驱动应用的数据源;
- view,以声明方式将 state 映射到视图;
- actions,响应在 view 上的用户输入导致的状态变化。 以下是一个表示“单向数据流”理念的简单示意:
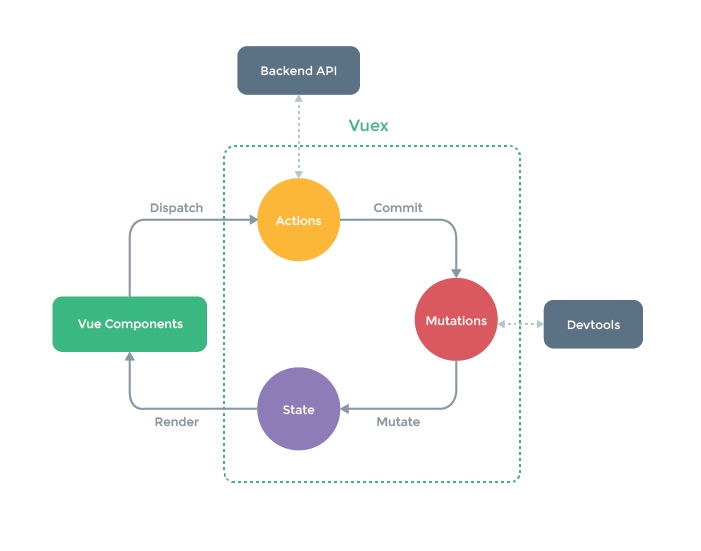
但是,当我们的应用遇到多个组件共享状态时,单向数据流的简洁性很容易被破坏:
- 多个视图依赖于同一状态。
- 来自不同视图的行为需要变更同一状态。
对于问题一,传参的方法对于多层嵌套的组件将会非常繁琐,并且对于兄弟组件间的状态传递无能为力。
对于问题二,我们经常会采用父子组件直接引用或者通过事件来变更和同步状态的多份拷贝。以上的这些模式非常脆弱,通常会导致无法维护的代码。
因此,我们为什么不把组件的共享状态抽取出来,以一个全局单例模式管理呢?在这种模式下,我们的组件树构成了一个巨大的“视图”,不管在树的哪个位置,任何组件都能获取状态或者触发行为!
通过定义和隔离状态管理中的各种概念并通过强制规则维持视图和状态间的独立性,我们的代码将会变得更结构化且易维护。
安装
安装vuex
在页面中引入vuex库
npm install vuex --save
该库提供了一个构造函数Vuex.Store,通过该构造函数,即可创建一个数据仓库
var store = new Vuex.Store({
  // 仓库数据配置
})
Vue.use(Vuex);
new Vue({
  // 其他配置
  store
})
简单使用示例
import Vuex from 'vuex'

Vue.use(Vuex);

var store = new Vuex.Store({
  // 仓库数据配置
  state: {
    count: 2,
    todos: [
      { id: 1, text: '完成SpringMVC学习', done: true },
      { id: 2, text: '完成Vue的学习', done: false },
      { id: 3, text: '完成Spring Cloud学习', done: false },
      { id: 4, text: '完成Mybatis学习', done: true }
    ]
  },
  getters: {
    doneTodos: (state, getters) => {
      return state.todos.filter(todo => todo.done)
    },
    donesCount:(state,getters) => {
      return getters.doneTodos.length
    },
    getTodoById: (state) => (id) => {
      return state.todos.find(todo => todo.id === id)
    }
    // 上面其实是箭头函数的简写
    // getTodoById:function(state){
    //   return function(id){
    //     let r = state.todos.find(function(item){
    //       return item.id === id
    //     })
    //     return r;
    //   }
    // }
  },
  mutations: {
    increment1 (state) {
      state.count++
    },
    increment2 (state, payload) {
      state.count = payload
    },
    increment3 (state, payload) {
      state.todos.push(payload.todo)
    }
  },
  actions: {
    add1(context) {
      context.commit('increment1')
      console.log(store.state.count);
    },
    add2(context,payload) {
      setTimeout(()=>{
        context.commit('increment2',payload);
        console.log(store.state.count);
      },1000);

    },
    add3(context,payload) {
      setTimeout(()=>{
        context.commit('increment3',payload);
        console.log(store.state.todos);
      },1000)
    }
  }
})

//当然需要在在Vue对象中引用
new Vue({
  render: h => h(App),
  store
}).$mount('#app')
使用:
<template>
  <div>
    <h3>{{ count }}</h3>
    <h3>===>{{ dones }}</h3>
    <h3>--->{{ getTodo() }}</h3>
    <ul>
      <li v-for="item in todos" :key="item.id">
        {{ item.text }}
      </li>
    </ul>

    <button type="button" @click="getIncrement1()">增加1</button>
    <button type="button" @click="getIncrement2()">增加2</button>
    <button type="button" @click="getIncrement3()">增加3</button>

    <hr />

    <button type="button" @click="add1()">action增加1</button>
    <button type="button" @click="add2()">action增加2</button>
    <button type="button" @click="add3()">action增加3</button>
  </div>
</template>
<script>
export default {
  // data() {
  //   return {
  //     count: this.$store.state.count,
  //     todos: this.$store.state.todos,
  //     dones: this.$store.getters.doneTodos,
  //   };
  // },
  computed:{
    count() {return this.$store.state.count},
    todos(){return this.$store.state.todos},
    dones(){
        return this.$store.getters.doneTodos;
    }
  }
  methods: {
    getTodo() {
      return this.$store.getters.getTodoById(2);
    },
    getIncrement1() {
      this.$store.commit("increment1");
      console.log(this.$store.state.count);
    },
    getIncrement2() {
      this.$store.commit("increment2", 20);
      console.log(this.$store.state.count);
    },
    getIncrement3() {
      this.$store.commit("increment3", {
        todo: { id: 5, text: "xxxx", done: true },
      });
      console.log(this.$store.state.todos);
    },
    add1() {
      this.$store.dispatch("add1");
    },
    add2() {
      this.$store.dispatch("add2", 20);
    },
    add3() {
      this.$store.dispatch({
        type: "add3",
        todo: { id: 6, text: "ooooo", done: false },
      });
    },
  },
};
</script>

<style></style>
核心
Vuex 主要有四部分:
- state:包含了store中存储的各个状态。
- getter: 类似于 Vue 中的计算属性,根据其他 getter 或 state 计算返回值。
- mutation: 一组方法,是改变store中状态的执行者,只能是同步操作。
- action: 一组方法,其中可以包含异步操作。
State
Vuex 使用 state 来存储应用中需要共享的状态。为了能让 Vue 组件在 state更改后也随着更改,需要基于state 创建计算属性。
数据配置:
var store = new Vuex.Store({
  // 仓库数据配置
  state: {
    count: 2,
    todos: [
      { id: 1, text: '完成SpringMVC学习', done: true },
      { id: 2, text: '完成Vue的学习', done: false },
      { id: 3, text: '完成Spring Cloud学习', done: false },
      { id: 4, text: '完成Mybatis学习', done: true }
    ]
  },
  .......
}
可以在data()或者计算属性中调用
export default {
    data() {
        return {
            count:this.$store.state.count,
            todos:this.$store.state.todos,
        }
    },
    ......
}
注意:state里面的数据在使用的时候,一般是挂在computed里面的,因为如果你挂在data上面,只会赋值一次,不会跟着vuex里面的变化而同步变化,当然也可以通过watch $store去解决这个问题,所以,如下:
computed:{
    count() {return this.$store.state.count},
    todos() {return this.$store.state.todos},
}
Getter
类似于 Vue 中的 计算属性(可以认为是 store 的计算属性),getter 的返回值会根据它的依赖被缓存起来,且只有当它的依赖值发生了改变才会被重新计算。
Getter 方法接受 state 作为其第一个参数:
......
getters: {
    doneTodos: (state) => {
      return state.todos.filter(todo => todo.done)
    },
}
......
Getter 会暴露为 store.getters 对象,可以以属性的形式访问这些值:
在组件中可以很方便的调用getters中的值
this.$store.getters.doneTodos
Getter 方法也接受 state和其他getters作为前两个参数。
......
getters: {
    doneTodos: (state) => {
      return state.todos.filter(todo => todo.done)
    },
    donesCount:(state,getters) => {
      return getters.doneTodos.length
    },
}
......
调用
this.$store.getters.donesCount
也可以通过让 getter 返回一个函数,来实现给 getter 传参。在对 store 里的数组进行查询时非常有用。
getters: {
    doneTodos: (state) => {
      return state.todos.filter(todo => todo.done)
    },
    donesCount:(state,getters) => {
      return getters.doneTodos.length
    },
    getTodoById: (state) => (id) => {
      return state.todos.find(todo => todo.id === id)
    }
    // 为了防止大家看不懂...上面的方法完整写法应该是下面这个样子
    // getTodoById:function(state){
    //   return function(id){
    //     let r = state.todos.find(function(item){
    //       return item.id === id
    //     })
    //     return r;
    //   }
    // }
  },
调用:
......
methods:{
    getTodo(){
        return this.$store.getters.getTodoById(2)
    },
}
......
Mutation
更改 Vuex 的 store 中的状态的唯一方法是提交 mutation。也就是说,前面两个都是状态值本身,mutations才是改变状态的执行者。
注意:mutations只能是同步地更改状态。
Vuex 中的 mutation 非常类似于事件:每个 mutation 都有一个字符串的 事件类型 (type) 和 一个 回调函数 (handler)。这个回调函数就是我们实际进行状态更改的地方,并且它会接受 state 作为第一个参数
......
mutations: {
    increment1 (state) {
        //变更状态
      state.count++
    },
}
......
调用:
methods:{
    getIncrement1(){
        this.$store.commit("increment1");
        console.log(this.$store.state.count);
    },
}
提交载荷(Payload)
......
mutations: {
    increment1 (state) {
      state.count++
    },
    increment2 (state, payload) {
      state.count = payload
    },
    increment3 (state, payload) {
      state.todos.push(payload.todo)
    }
},
......
调用
methods:{
    getIncrement1(){
        this.$store.commit("increment1");
        console.log(this.$store.state.count);
    },
    getIncrement2(){
        this.$store.commit("increment2",20);
        console.log(this.$store.state.count);
    },
    getIncrement3(){
        this.$store.commit("increment3",{
            todo:{id: 5, text: 'xxxx', done: true}
        });
        console.log(this.$store.state.todos);
    }
}
其中,increment2 第一个参数是state,后面的参数是向 store.commit 传入的额外的参数,即 mutation 的 载荷(payload)。
store.commit方法的第一个参数是要发起的mutation类型名称,后面的参数均当做额外数据传入mutation定义的方法中。
规范的发起mutation的方式如下:
// 以载荷形式
this.$store.commit("increment3",{
    todo:{id: 5, text: 'xxxx', done: true}
});
额外的参数会封装进一个对象,作为第二个参数传入mutation定义的方法中。
mutations: {
  increment (state, payload) {
    increment3 (state, payload) {
      state.todos.push(payload.todo)
    }
  }
}
Action
想要异步地更改状态,就需要使用action。action并不直接改变state,而是发起mutation。
注册一个简单的 action:
actions: {
    add1(context) {
      context.commit('increment1')
      console.log(store.state.count);
    },
    add2(context,payload) {
      setTimeout(()=>{
        context.commit('increment2',payload);
        console.log(store.state.count);
      },1000);

    },
    add3(context,payload) {
      setTimeout(()=>{
        context.commit('increment3',payload);
        console.log(store.state.todos);
      },1000)
    }
}
Action 函数接受一个与 store 实例具有相同方法和属性的 context 对象,因此你可以调用 context.commit 提交一个 mutation,或者通过 context.state 和 context.getters 来获取 state 和 getters。
发起action的方法形式和发起mutation一样,只是换了个名字dispatch。
// 以一般形式调用
this.$store.dispatch("add2", 20);
// 以对象形式分发Action
this.$store.dispatch({
    type: "add3",
    todo: { id: 6, text: "ooooo", done: false },
});
Action处理异步的正确使用方式
想要使用action处理异步工作很简单,只需要将异步操作放到action中执行(如上面代码中的setTimeout)。
// 假设 getData() 和 getOtherData() 返回的是 Promise
actions: {
  async actionA ({ commit }) {
    commit('gotData', await getData())
  },
  async actionB ({ dispatch, commit }) {
    await dispatch('actionA') // 等待 actionA 完成
    commit('gotOtherData', await getOtherData())
  }
}
Action与Mutation的区别
Action 类似于 mutation,不同在于:
- Action 提交的是 mutation,而不是直接变更状态。
- Action 可以包含任意异步操作,而Mutation只能且必须是同步操作。
Module
由于使用单一状态树,应用的所有状态会集中到一个比较大的对象。当应用变得非常复杂时,store 对象就有可能变得相当臃肿。 这时我们可以将 store 分割为模块(module),每个模块拥有自己的 state 、 getters 、mutations 、actions 、甚至是嵌套子模块——从上至下进行同样方式的分割。
简单示例
const moduleA = {
  state: { ... },
  mutations: { ... },
  actions: { ... },
  getters: { ... }
}

const moduleB = {
  state: { ... },
  mutations: { ... },
  actions: { ... }
}

const store = new Vuex.Store({
  modules: {
    a: moduleA,
    b: moduleB
  }
})

store.state.a // -> moduleA 的状态
store.state.b // -> moduleB 的状态
辅助函数方法
为了简便起见,Vuex 提供了四个辅助函数方法用来方便的将这些功能结合进组件。
- mapState
- mapGetters
- mapMutations
- mapActions
示例代码:
import { mapState, mapGetters, mapMutations, mapActions } from 'vuex'

export default {
    // ...
    computed: {
      localComputed () { /* ... */ },
        // 使用对象展开运算符将此对象混入外部对象中
      ...mapState({
        // 为了能够使用 `this` 获取局部状态,必须使用常规函数
        count(state) {
          return state.count + this.localCount
        }
      }),
      ...mapGetters({
        getterCount(state, getters) {
          return state.count + this.localCount
        }
      })
    }
    methods: {
      ...mapMutations({
          // 如果想将一个属性另取一个名字,使用以下形式。注意这是写在对象中
           add: 'increment' // 将 `this.add()` 映射为`this.$store.commit('increment')`
        }),
      ...mapActions({
          add: 'increment' // 将 `this.add()` 映射为 `this.$store.dispatch('increment')`
        })
    }
}
如果结合进组件之后不想改变名字,可以直接使用数组的方式。
methods: {
    ...mapActions([
      'increment', // 将 `this.increment()` 映射为 `this.$store.dispatch('increment')`

      // `mapActions` 也支持载荷:
      'incrementBy' // 将 `this.incrementBy(amount)` 映射为 `this.$store.dispatch('incrementBy', amount)`
    ]),
}
之前的调用可以用这几个辅助函数改写:
<template>
  <div>
    <h3>{{ count }}</h3>
    <h3>===>{{ dones }}</h3>
    <h3>--->{{ getTodo() }}</h3>
    <ul>
      <li v-for="item in todos" :key="item.id">
        {{ item.text }}
      </li>
    </ul>

    <button type="button" @click="getIncrement1()">增加1</button>
    <button type="button" @click="getIncrement2()">增加2</button>
    <button type="button" @click="getIncrement3()">增加3</button>

    <hr />

    <button type="button" @click="add1()">action增加1</button>
    <button type="button" @click="trigerAdd2()">action增加2</button>
    <button type="button" @click="trigerAdd3()">action增加3</button>
  </div>
</template>
<script>
import { mapState,mapGetters,mapMutations,mapActions } from "vuex";
export default {
  computed:{
    ...mapState({
      count:"count",
      todos:"todos",
    }),
    ...mapGetters({
      dones:"doneTodos"
    })
  },
  methods: {
    ...mapMutations(["increment1","increment2","increment3"]),
    ...mapActions(["add1","add2","add3"]),
    getTodo() {
      return this.$store.getters.getTodoById(2);
    },
    getIncrement1() {
      this.increment1()
      console.log(this.$store.state.count);
    },
    getIncrement2() {
      this.increment2(20)
      console.log(this.$store.state.count);
    },
    getIncrement3() {
      this.increment3( {
        todo: { id: 5, text: "xxxx", done: true },
      })
      console.log(this.$store.state.todos);
    },
    trigerAdd2() {
      this.add2(50);
    },
    trigerAdd3() {
      this.add3({todo: { id: 7, text: "ooooo", done: false },});
    },
  },
};
</script>

<style></style>
在工程中使用Vuex
在工程中使用vuex肯定是要遵循工程化的内容,使用模块化的方式
在现在的工程中,新闻频道信息有几处地方都在使用,而且,频道信息几乎很少变化。因此是最适合放在vuex中的共享数据。
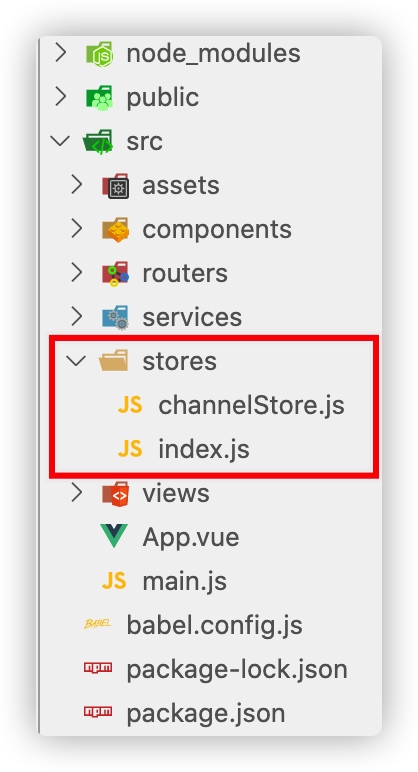
1、创建channelStore模块
import {getNewsChannels} from '@/services/NewsService'

export default{
    namespaced:true,
    state:{
        channels:[],
        isLoading:false
    },
    mutations:{
        setIsLaoding(state,payload){
            state.isLoading = payload;
        },
        setChannels(state,payload){
            state.channels = payload;
            console.log(state.channels);
        }
    },
    actions:{
        async fetchChannels(context){
            let resp = await getNewsChannels();
            context.commit("setChannels",resp);
        }
    }
}
2、创建index.js文件
这个文件的主要作用是创建vuex的store对象,并引用module模块
import Vue from 'vue'
import vuex from 'vuex'
import channelStore from './channelStore';

Vue.use(vuex);

var store = new vuex.Store({
    modules:{
        channelStore
    }
});

export default store;
3、在main.js引入store
在main.js主要是注入store对象,并且调用action的fetchChannels方法,在程序启动的时候就访问远程channel数据放入到store中
...其他代码省略
import store from './stores'

//程序启动的时候就调用action
store.dispatch("channelStore/fetchChannels");

new Vue({
  render: h => h(App),
  router,
  store
}).$mount('#app')
4、替换Channels.vue中的数据获取方式
import {mapState} from 'vuex'
export default {
    //其他代码省略
    computed:{
        ...mapState("channelStore",["channels"]),
        //其他代码省略
    },
    watch: {
      channels:{
          immediate:true,
          handler(){
              if(this.channels.length > 0){
                  this.changeChannel(this.channels[0].channelId);
              }
          }
      }
    },
}
除了Channels.vue组件,我们在Header.vue组件中其实也用到了频道数据
因此,也可以直接进行替换
5、替换Header.vue中关于频道的数据
// 模板代码省略
import { mapState } from "vuex";
import logo from '@/assets/logo.png'
export default {
  components:{
    logo
  },
  data() {
    return {
      logUrl:logo,
    }
  },
  computed:{
    ...mapState("channelStore", ["channels"]),
  }
}
Comments